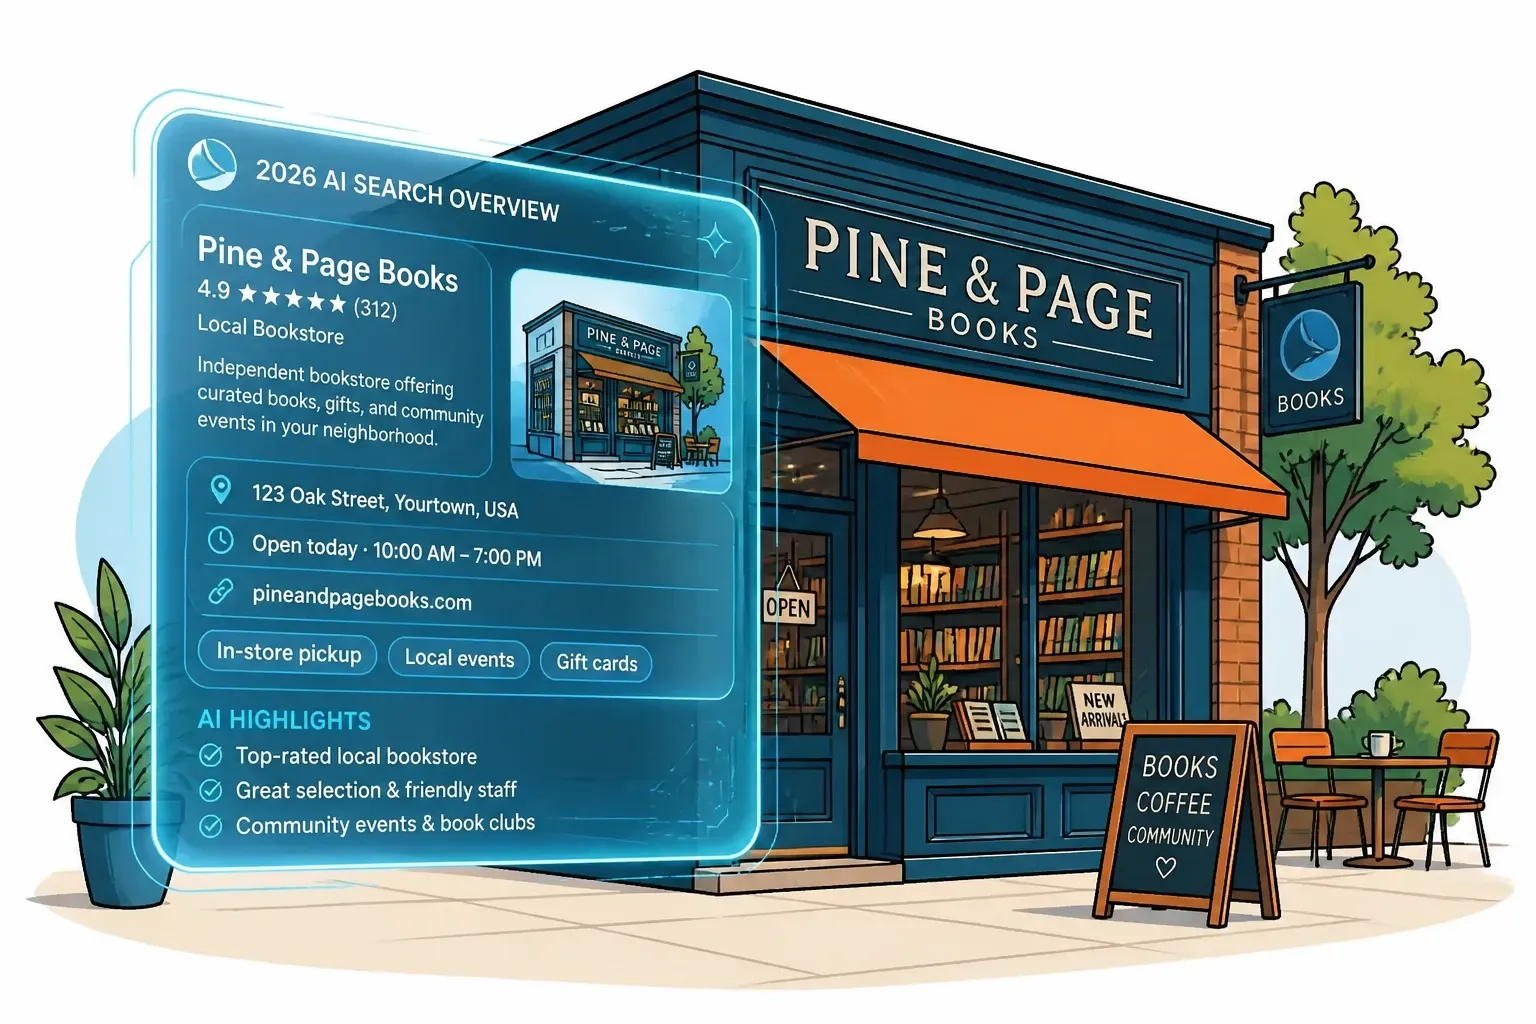
The 10 blue links are gone. In 2026, local SEO means getting cited by AI Overviews. Learn how GEO, Google Business Profile, and E-E-A-T keep your business visible.
Discover proven strategies for real estate agents to optimize their content and websites for AI search platforms like ChatGPT, Claude, and Perplexity. Learn how to dominate AI-powered search results and attract more qualified leads in 2026.
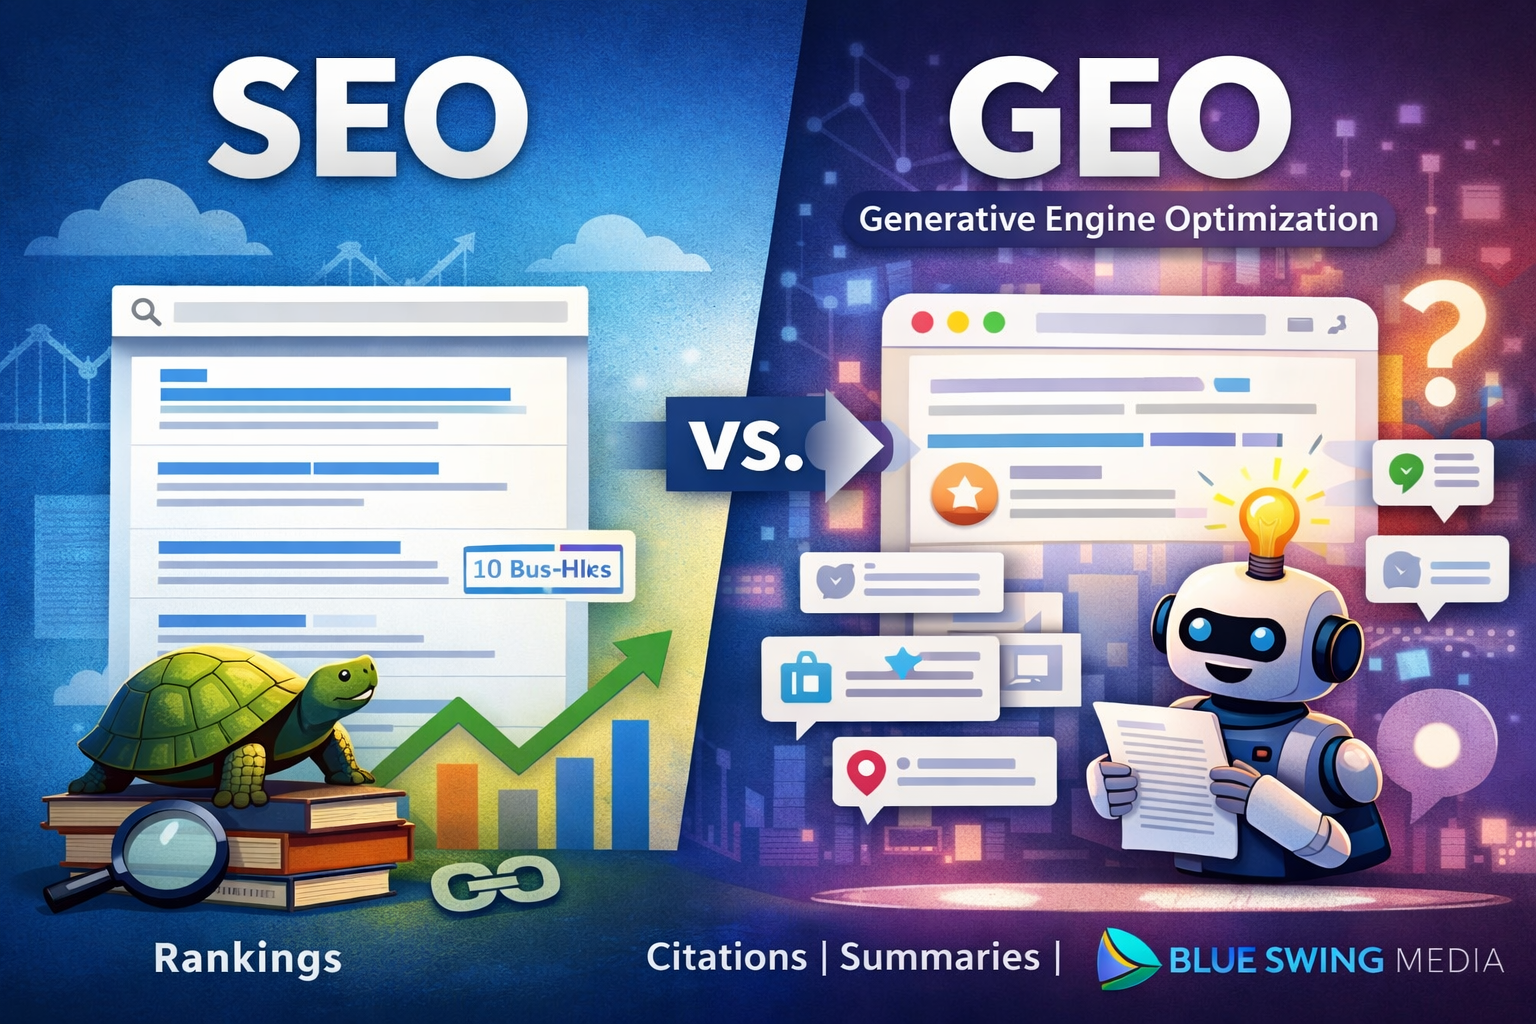
A lot has changed since I published Digital Marketing with Tortoise & Hare in 2017. Back then, the digital marketing conversation was heavily centered on websites, search rankings, social media consistency, and building momentum over time. Those principles still matter, but the landscape has shifted in a big way. Even the way people discover businesses and consume information has changed. My book was published on June 12, 2017, and in many ways, that feels like a different era of digital marketing. One of the newer terms getting a lot of attention right now is GEO , which stands for Generative Engine Optimization . If you’ve been hearing people throw that term around and wondering whether it’s just another buzzword, you’re not alone. But there is something real behind it, and it’s worth understanding. So, What Is GEO? GEO is essentially the practice of optimizing your business, website, and content so that AI-driven search experiences can find, understand, trust, and reference you. Traditional SEO has focused on helping your website rank in search engine results. GEO is more about helping your brand show up in AI-generated answers , summaries, recommendations, and citations. In simple terms: SEO helps you rank. GEO helps you get referenced. That’s a meaningful distinction. Today, people are no longer just typing a keyword into Google and clicking through ten blue links. More and more, they are asking full questions and receiving summarized answers from AI tools. That means your content is not only competing for rankings anymore. It is also competing to become part of the answer itself. Has SEO Been Replaced? No. Let me say that clearly: GEO does not replace SEO. It builds on it. If your website is poorly structured, your content is thin, your service pages are weak, and your business has little authority online, then GEO is not going to magically fix that. The same foundational principles still matter: a technically sound website strong service and location pages clear messaging helpful content consistent brand signals trust and authority In other words, the tortoise still matters. Steady, strategic digital marketing still wins over hype, shortcuts, and shiny-object syndrome. That hasn’t changed. What has changed is that now your content needs to be useful not just for human readers and search crawlers, but also for AI systems trying to summarize the web. Why GEO Matters If AI-powered search experiences continue to grow, businesses that are easiest to understand and trust will have an advantage. That means the question is no longer just: “How do I rank for this keyword?” It’s also: “How do I become the kind of source that AI tools want to cite, summarize, and recommend?” That changes the strategy. Businesses that win in this next phase will likely have content that is: clear direct well-structured specific trustworthy supported by real-world authority The businesses that struggle will often be the ones still publishing vague, bloated, keyword-stuffed content that says a lot without really answering anything.

Most People Think They Understand AI Search. They Don’t. And that misunderstanding is exactly why they’re not showing up in: Perplexity Google AI Overviews (Gemini) ChatGPT web results Let’s break something open that most churches and ministries haven’t realized yet. The Assumption That’s Costing You Visibility You search for: “churches near me” You check Google. You see the top results—maybe even your church is listed. So logically… 👉 Those should be the churches AI recommends, right? Wrong. The Strange Reality of AI Search In many cases, AI-generated answers (especially in Google AI Overviews or Perplexity) recommend churches that: Aren’t at the very top of Google Sometimes aren’t even the most obvious local options At first glance, it feels random. It’s not. It’s a pattern. “Wait… Doesn’t Local SEO Still Matter?” Yes. It absolutely does. Showing up in Google Maps, having reviews, and optimizing your website are still critical foundations . But here’s the shift most churches don’t see: 👉 Your keyword is just the starting point. Not the final query. What AI Is Actually Doing Behind the Scenes AI doesn’t just take “churches near me” at face value. It reinterprets the intent. Inside tools like Google’s Gemini, if you dig a little deeper, you’ll notice something like this: “The user wants a church… but what kind? Maybe they want a family-friendly church… or a Bible-based church… or something with kids programs… I should search for: family-friendly churches near me with kids ministry” 💥 That’s the turning point. Why Your Church Isn’t Showing Up Here’s what happens next: AI rewrites the query It searches using its version of the intent It pulls churches that match that refined query So now… 👉 The churches being recommended are NOT just optimized for “churches near me.” They’re aligned with something like: “family-friendly church near me” “church with strong kids ministry near me” “non-denominational church with modern worship near me” Proof in Action If you take one of those rewritten queries, like: “family-friendly church near me with kids ministry” …and search it yourself… You’ll often see: 👉 The same churches AI is recommending. This pattern shows up across: Gemini (Google AI Overviews) ChatGPT search Perplexity And it’s consistent. The Hard Truth No One Is Talking About Let’s be clear: ❌ Your church isn’t being ignored ❌ SEO isn’t broken 👉 You’re losing interpretation battles. The New Game: AI Search for Churches If you want your church to show up in AI-driven results, here’s what actually works: 1. Start with the Core Search Think: “churches near me” “church in [your city]” 2. Identify How AI Expands It Ask: What kind of church is someone looking for? What concerns or needs might they have? Examples: Families with kids Young adults Spanish-speaking communities Bible-teaching focus 3. Discover the Rewritten Queries These might look like: “family-friendly church in [city]” “Christian church with youth group near me” “church with Spanish service near me” “small church with strong community near me” 4. Create Content That Matches Not just a generic homepage. But pages or sections that clearly communicate: Kids ministry Youth programs Worship style Beliefs Community life 5. Align With How AI Thinks When your church clearly answers those deeper needs… 👉 AI starts including you in its recommendations. This Isn’t About Doing More. It’s About Being Clearer. You don’t need: More complicated SEO strategies More technical tricks You need: 👉 Clear alignment with real human intent—through the lens of AI. Final Thought AI search is changing how people find a church. They’re not just searching… 👉 They’re asking. And AI is answering based on interpreted needs , not just keywords. The churches that will grow in this new landscape aren’t just visible. They’re understood.
At Blue Swing Media, we believe every mission deserves clarity. Recently, we had the privilege of developing the brand identity and building the new non-profits website for Brighter Story — an organization currently in the process of gaining official nonprofit status. This project wasn’t just about launching a website. It was about building a digital foundation for long-term mission growth. You can explore the live site here: 👉 https://www.brighterstory.org Starting with Brand: Designing a Logo That Communicates Mission Every strong non-profit begins with a clear identity. For Brighter Story, we developed a logo that communicates: Hope Light Forward movement Story-driven impact The brand direction centers around the idea that every individual and every community carries a story worth telling — and that those stories can shine brighter when given the right platform. The visual identity reflects: Clean, modern typography A hopeful color palette Balanced design suitable for digital and print Scalability for future fundraising materials, social campaigns, and outreach programs For nonprofits, branding isn’t vanity — it’s credibility. A cohesive identity builds trust with donors, volunteers, and community partners. Building a Non-Profits Website That Works for Growth Many nonprofit websites look good but lack strategic functionality. When developing Brighter Story’s non-profits website, our focus was on long-term sustainability and growth. We prioritized: 1. Clear Mission Communication Visitors should immediately understand: Who the organization serves What problem it addresses How they can get involved Clarity builds connection. 2. Donation-Ready Infrastructure Even while in the process of obtaining nonprofit status, the site was built with: Scalable donation capability Clean call-to-action placements Simple user flows for giving Mobile-optimized contribution pages Non-profits websites must reduce friction. Every extra click lowers conversion rates. 3. Volunteer & Community Engagement Features The site architecture allows for: Easy expansion into volunteer sign-ups Event promotion capabilities Story-driven blog content Email list growth Impact updates Nonprofits thrive when their communities feel involved — not just informed. 4. SEO-Optimized Structure for Visibility A strong non-profits website must also be discoverable. The build includes: Proper heading structure Optimized metadata Clean URL architecture Mobile responsiveness Fast load speeds As Brighter Story grows, this SEO foundation will allow the organization to rank for mission-related search terms and attract organic traffic from people already searching for ways to give and engage. Why Non-Profits Website Strategy Matters Nonprofits face unique challenges: Limited budgets High trust requirements Dependence on donations Volunteer-driven growth Grant visibility requirements A non-profits website must function as: A credibility builder A storytelling platform A fundraising tool A recruitment engine A community hub Without strategy, a website becomes a digital brochure. With strategy, it becomes a growth engine. Designing for the Future of Brighter Story Because Brighter Story is in the process of gaining nonprofit status, the website was built to scale. Future-ready features include: Grant-friendly content sections Impact reporting areas Testimonial and story showcases Newsletter integration Campaign landing page capability Analytics tracking for growth measurement This ensures that as the organization expands, the website won’t need to be rebuilt — it will simply evolve. The Power of Story-Driven Design The name Brighter Story guided the creative process. Instead of a generic nonprofit layout, we emphasized: Narrative-focused sections Emotional clarity Strong visual hierarchy Strategic whitespace Mobile-first design People give to stories. People volunteer for stories. People share stories. The website is structured to make storytelling central — not secondary. Final Thoughts: Every Mission Deserves a Strong Digital Foundation Launching Brighter Story’s non-profits website was more than a design project. It was about aligning brand, technology, and mission into a unified digital presence. If you’re building or rebuilding a non-profits website, ask yourself: Does it clearly communicate your mission? Is it donation-ready? Is it mobile-optimized? Is it built for long-term growth? Does it make engagement simple? If not, it may be time to move beyond a basic website — and build something that fuels impact. You can view the Brighter Story website here: 👉 https://www.brighterstory.org

If you’re a real estate agent or broker, you’ve probably heard of Go High Level. You may even know it’s “powerful” and “can run your whole business” — but when you log in, it feels like a cockpit. Dozens of features, endless menus, and no clear roadmap for what you actually need to use. The good news: as a real estate professional, you don’t need everything. You just need a few core pieces set up correctly: A simple pipeline that matches how you work Automated follow-up so no lead slips through the cracks Smart tagging and routing so leads go to the right place Appointment reminders that reduce no‑shows Easy open house and offer follow-ups Basic dashboards so you can see what’s working In this guide, we’ll walk through how to set up Go High Level for a real estate business step by step — and how to use it without getting buried in complexity. Why Go High Level Is a Good Fit for Real Estate Go High Level (often written as GoHighLevel or GHL) is an all‑in‑one platform that can: Capture leads from forms, funnels, and ads Store and organize contacts like a CRM Automate follow‑ups via email, SMS, and even ringless voicemail Track deals in pipelines Book and manage appointments Build simple landing pages and funnels For real estate agents and brokers, that means you can: Respond instantly to new leads Keep track of buyers and sellers by stage and property Follow up after open houses Send appointment reminders automatically Stay on top of which leads came from where You don’t have to use every feature. If you focus on a handful of essentials, you’ll get real value quickly — and you can grow from there. Step 1: Start With a Real Estate Sub‑Account and Snapshot Go High Level lets you create sub accounts — essentially separate spaces for each business. If you’re just getting started: Go to your Agency account. Click Sub accounts in the left menu. Click Create sub account . Search for Real Estate snapshots. You’ll see options like: Real Estate Agent Real Estate Broker Pick the one that matches you best. These snapshots come preloaded with: Real estate pipelines Basic automations Landing page templates Then: Add your business information (address, name, etc.). Click Add sub account . Switch into it with Switch to sub account . This gives you a solid starting point tailored to real estate rather than a blank, generic setup. Step 2: Build a Pipeline That Matches Your Real Estate Workflow Your pipeline is where you visually track deals from “new lead” to “closed.” The real estate snapshot usually includes a default pipeline with stages like: New lead Hot lead New booking Visit attended Deal Left a review You can keep this, or you can create your own so it reflects how you actually work. How to Create a Custom Pipeline Go to Opportunities . Click Pipelines . Click Create pipeline . For a buyer pipeline , for example, you might set stages like: New lead Contacted Appointment set Showing Offer made Closed For a seller pipeline , you could have: New listing Photos taken On market Offer received Sold Name the pipeline and click Create . Then, in the top left, switch to your new pipeline to start using it. Tip: If you work with both buyers and sellers, create separate pipelines. It keeps your view clean and makes follow‑up easier. Step 3: Automate Lead Follow‑Up So You Respond Instantly This is where Go High Level really shines. Most agents lose business not because they don’t get leads — but because they don’t follow up quickly or consistently. With Go High Level, you can create workflows that: Trigger when a new lead comes in Send an immediate SMS and/or email Add the lead to a pipeline Assign it to an agent Continue nurturing over days or weeks Start with a Simple New Lead Workflow Go to Automations → Workflows . Click Create workflow → Start from scratch (or use “New Lead Nurture – Fast 5” as a base). Add a trigger , such as: Form submitted (for website or funnel forms) Facebook lead form submitted TikTok form submitted LinkedIn lead form submitted New contact created Appointment booked If you’re using a standard Go High Level form, choose: Trigger: Form submitted Filter: Form is [Your Buyer/Seller Form] Once you’ve set your trigger, add actions like: Create/Update Contact – to ensure the lead is saved properly Add to Pipeline – put them into the “New lead” stage of your buyer or seller pipeline Send SMS – something friendly and immediate, like: “Hi {{contact.first_name}}, thanks for reaching out about homes in {{location}}. Would you like to schedule a quick call to talk about what you’re looking for?” Send Email – a slightly more detailed introduction and next steps Wait steps and If/Else conditions – for follow‑ups based on whether they reply You can also use the prebuilt New Lead Nurture (Fast 5) workflow in Go High Level. It typically: Triggers when someone submits an offer form or Facebook lead form Creates a new opportunity in the New lead stage Sends a conversational email and SMS Waits for replies Moves leads to Hot lead if they reply Triggers call connect actions This is a great starting point if you don’t want to build from scratch. Step 4: Auto‑Tag and Route Your Leads for Better Organization Once leads are flowing in, you want them automatically: Tagged (e.g., buyer, seller, rental, luxury, open house) Routed to the right pipeline and agent This keeps your database clean and makes it easy to run targeted follow‑ups. Tagging Leads Based on Forms and Sources Say you have different forms: Buyer form Seller form Open house form Free home valuation form You can: Use a trigger like Form submitted or Facebook lead form submitted . Filter by specific form. Add an action: Add contact tag . Useful tags might include: Buyer / Seller Rental Luxury listing Came from Facebook Came from Google Open house – 123 Main St Free home valuation With these tags in place, you can quickly filter contacts, build targeted campaigns, or trigger routing automations. Routing Leads to the Right Agent You can also route leads based on tags. Example: all Buyer leads go to your buyer’s agent. Create a new workflow with trigger Contact tag . Filter: Tag added is Buyer. Add action: Assign to user . Choose the agent responsible for buyer leads. You can set up similar workflows for sellers, rentals, or specific property types or locations. This way: Facebook buyer leads go straight into your buyer pipeline Seller leads go to your listing pipeline Agents see only the leads they’re responsible for No manual sorting. Less confusion. Faster response times. Step 5: Set Up Appointment Reminders to Reduce No‑Shows Once you’re booking showings and consultation calls, appointment reminders can dramatically reduce no‑shows. Create a Calendar in Go High Level Go to Calendars → Calendar settings . Click New calendar . Choose the calendar type: Personal booking – for one agent Round robin – for multiple team members Class booking – useful if you want a “group” appointment (e.g., open house time slots) Name the calendar (e.g., “Buyer Consultation,” “Listing Appointment,” “Property Showing”). Add team members if using round robin. Set: Meeting duration Bookable times Buffer times between appointments Then, connect it to your personal calendar: Go to Connections Click Add new Connect Google Calendar, Outlook, iCloud, or Calendly Now, when someone books through this calendar, it automatically shows up in your personal calendar. Use Automated Confirmation and Reminder Workflows Go High Level usually includes a workflow like “Appointment Confirmation and Reminders.” This can: Trigger when an appointment is confirmed Update the opportunity stage to something like Appointment set Send a confirmation email: “Hi {{contact.first_name}}, your appointment has been confirmed for {{appointment.start_date}} at {{appointment.start_time}} {{appointment.time_zone}}.” Send reminder emails: 24 hours before 1 hour before Send SMS reminders (e.g., 1 hour before) If someone doesn’t show, another workflow can trigger on Appointment status: No show and: Send a link to reschedule Follow up again after a day This combination keeps your calendar fuller and minimizes missed opportunities. Step 6: Automate Open House Follow‑Ups Open houses are great for collecting warm leads — but those leads often go cold if you don’t follow up quickly and consistently. Go High Level makes it easy to: Capture visitor info Tag them based on the specific open house Send personalized follow-ups with similar listings or next steps Create a Simple Open House Form Go to Sites → Forms → Form builder . Build a form that collects: Name Email Phone What they’re looking for (beds, baths, budget, area) You can use this: On a tablet at the open house As a QR code link (visitors scan and fill it out on their phone) Embedded on your website As part of your Facebook lead ad form that’s integrated into Go High Level Automate the Follow-Up Use a Form submitted trigger for your open house form. Add an action to Add contact tag , e.g.: Open house – 123 Main St. Add actions to: Send an immediate “Thanks for stopping by” email or SMS Include links to similar listings or next steps Add them to a Warm leads pipeline Set reminders for follow‑up calls or texts Example SMS: “Hi {{contact.first_name}}, thanks for visiting the open house at 123 Main St today. I’ve got a few similar properties you might like — want me to send them over?” This simple automation helps you stay top‑of‑mind and turn casual open house visitors into real opportunities. Step 7: Use Dashboards to See What’s Working (and Fix What Isn’t) Once everything is up and running, you don’t want to guess how it’s performing. Check your Dashboard or Reports in Go High Level regularly (weekly works well). You can see: How many leads are coming in Which sources (Facebook, Google, website, open houses) are performing best How many leads are moving from stage to stage in your pipeline Where deals tend to get stuck From there, make small tweaks like: Adjusting the delay between follow‑up messages Refining your SMS and email templates Changing which tags trigger which workflows Fine‑tuning your pipelines or reminders Often, small improvements in timing or messaging can significantly boost your response rates and conversions. Bonus: Simple Funnels and Offers for Real Estate You don’t need complex funnels to generate leads. Go High Level snapshots for real estate often come with ready‑made pages like: Free home valuation offer Home buying consultation Seller consultation For example, you could: Run Facebook ads to a free home valuation landing page Collect details through a form Tag those leads as Free home valuation Trigger an automation that: Reminds you to prepare the valuation Sends a follow‑up message to schedule a consultation Adds them to a seller pipeline This turns a simple offer into a structured system that consistently feeds your business. Keep It Simple, Then Grow Go High Level has dozens of features — social planners, reputation management, and more — but you don’t need all of them on day one. If you’re a real estate agent or broker, start with: A buyer and/or seller pipeline New lead follow‑up workflows (email + SMS) Tagging and routing rules Appointment calendars and reminders Open house follow‑up Basic dashboard checks Once those are in place and working, you can gradually add: Social media scheduling Review generation (reputation management) More advanced campaigns and funnels The goal isn’t to use every feature — it’s to build a system that quietly saves you hours each week and helps you close more deals. Need Help Setting This Up? If you’d like to use Go High Level (or any CRM/automation system) but don’t have the time or desire to configure it yourself, Blue Swing Media can help. We work with small businesses and local service providers — including real estate professionals — to: Set up practical, easy‑to‑use pipelines Build automated follow‑ups that feel personal, not spammy Connect your website, ads, and forms so every lead is tracked Create landing pages and offers that actually convert If you want a real estate system that runs smoothly in the background while you focus on serving clients, reach out to Blue Swing Media. We’ll help you implement the strategies in this guide and tailor them to your business, your market, and your goals.

Having A Clear Plan Can Make All The Difference!


Are you looking for new ideas to market your small business? Here’s an interesting post discussing content marketing and its effectiveness for small businesses.

Leveraging Storytelling in Your Local Content Marketing to Boost Reliability and Engagement