Reusing Content that you Already Have to Triple your Reach
Blue Swing Media • September 21, 2019
Advanced Content Marketing Tips
It isn’t always easy to create brand new content. It takes lots of research to create and time to edit before publishing it. Even after that, you have to spend a lot of time and money to promote it. It must be shared across social media, you need to send out emails to subscribers, and you have to optimize it to get the best results.
If you do all of that – and do it right – then you’ll get some extra traffic from the article. You could spend extra time building backlinks so that it outranks competitors in search results, but that process is never-ending. Most people have already moved on by that point.
What if there was a way to use old posts again and turn them into something new? That’s where repurposing content comes into play. Here are some advanced content marketing techniques for content you already have.
1. Make Videos Out of Old Blog Posts
Given the popularity of videos, it makes sense to turn a highly-performing article and convert it into a long-form video. Take the video and post it to YouTube so that new people can enjoy it and engage with it.
While long-form videos don’t do too well on other social media platforms, you can get a good response for short-form videos on Twitter and Facebook. You can take the same posts you turned into videos for YouTube and focus on the key points to keep the video short, sweet, and ready for social media.
2. Create Infographics
Infographics are another good way to get more from old content. What’s great about them is that you don’t have to be – or hire – a design expert to make a good infographic. There are several do-it-yourself tools you can use to make them such as Visme, Venngage, and Canva. These tools let you put a solid looking infographic together in a matter of minutes.
If you don’t have the time, energy, or bandwidth for making an infographic you could always outsource it to someone else. Fiverr is filled with talented people who can get the job done, and Design Pickle is a more professional service (at a professional price).
After designing and publishing your infographic you can submit it to infographic submission sites to give it some extra power. You should also share it across Tumblr, Reddit, and Pinterest to boost their social reach.
3. Repost Articles on Quora
Ever since Quora was launched in 2010, it has built up a strong and steady reputation and currently sees around 200 million active users each month. If you were to search Google for a question you’d almost always see a Quora search result within the first few results.
Quora offers two ways to repurpose blog content. The first is to create a blog page on Quora and syndicating popular content there. The other is to answer questions related to your content on Quora. The catch is that if you answer questions without doing any research you’ll likely not have any results at all.
4. Convert Posts into Podcasts
Podcasts have become more popular in recent years. If you’ve got a podcast of your own already, then you can just convert a popular post into a podcast episode. If you haven’t started a podcast yet, then it’s time that you jumped on the podcast train. The app Anchor (available on Android, iOS, and desktop web) lets you get set up without any extra equipment.
Anchor allows you to record, host, and distribute podcasts on all major podcasting platforms including Spotify, Google Podcasts, and Apple Podcasts.
After you publish your podcast you can start promoting it to generate more traffic.
5. Create Interactive Content
Having interactive content on your website helps you to stand out against the crowd. According to Business2Community, 88% of marketers say that this interactive content is how they differentiate themselves from the competition.
Thanks to tools like Ion Interactive and Outgrow it’s never been easier to create surveys, quizzes, and other interactive content.
6. Create eBooks Using Popular Posts
Every long-form post could potentially become an ebook that you can then use to entice subscribers into joining your email list. Ebooks make for fantastic lead magnets after all. You could take a single long-form posts and use it to make an eBook, or take several posts on a single topic and connect them together as a guide to that topic.
It’s recommended that you use services such as Beacon to convert blog posts into eBooks. Beacon offers a free plan but you can upgrade to the professional plan ($49/month) to enjoy more benefits and features.
7. Create Presentations from Blog Posts
Another way to get more power from your posts is to turn them into presentations. There are lots of programs that let you do this including Canva, Keynote, Slidebean, and good old fashioned PowerPoint. After you complete your presentation, you can upload it to SlideShare and then embed it into the most relevant posts.
Slideshare has around 80 million active users and it gets a lot of traffic from online searches. That’s why it’s a great place to put presentations. It puts them in a position to get more attention and potentially drive more traffic to your website.
8. Host Webinars
If you have a post that gets a lot of good attention then it’s a sign that you’re giving your target audience something they are interested in. It’s time to consider taking that post and turning it into a webinar on a subject that has generated a lot of organic search traffic for your website.
You could also post a poll on the blog and let your audience choose a topic for you so you can pick something they really want.
Hosting a webinar repurposes content effectively and also helps you to reach out to a wider audience. On top of that, it also builds your email subscriber list. Tools like EasyWebinar make it easy (pardon the pun) to host webinars live or play a pre-created automated webinar.
9. Create an Email Series
You can consider using a series of posts to create an automated series of emails. This gives you the chance to send your best content directly to email subscribers. Choose 10 popular posts and turn them into automated emails that are triggered whenever someone signs up to your email list.
10. Create Micro-Content for Social Media
Long-form blog posts likely have a lot of statistics, facts, and other observations. You can turn that information and distribute it across social media in the form of micro-content to get more attention and build engagement.
Start out by choosing a piece of “pillar content”; a long-form piece of content such as a podcast, video, interview, or vlog. Then turn that long content into several pieces of micro-content such as images, GIFs, quotes, mashups, and blog posts. You can take that content and post it across social media.
Summary
If you need new content for your website, you might not actually need new content at all. There are many ways to repurpose existing content to get more out of it. Try a few different things to see what works well for you and your content.
If you do all of that – and do it right – then you’ll get some extra traffic from the article. You could spend extra time building backlinks so that it outranks competitors in search results, but that process is never-ending. Most people have already moved on by that point.
What if there was a way to use old posts again and turn them into something new? That’s where repurposing content comes into play. Here are some advanced content marketing techniques for content you already have.
1. Make Videos Out of Old Blog Posts
Videos perform well on YouTube of course, but they are also effective on Facebook. Buzzsumo recently analysed 100 million Facebook videos and learned that videos are the most engaging kind of content for Facebook.
Given the popularity of videos, it makes sense to turn a highly-performing article and convert it into a long-form video. Take the video and post it to YouTube so that new people can enjoy it and engage with it.
While long-form videos don’t do too well on other social media platforms, you can get a good response for short-form videos on Twitter and Facebook. You can take the same posts you turned into videos for YouTube and focus on the key points to keep the video short, sweet, and ready for social media.
2. Create Infographics
Infographics are another good way to get more from old content. What’s great about them is that you don’t have to be – or hire – a design expert to make a good infographic. There are several do-it-yourself tools you can use to make them such as Visme, Venngage, and Canva. These tools let you put a solid looking infographic together in a matter of minutes.
If you don’t have the time, energy, or bandwidth for making an infographic you could always outsource it to someone else. Fiverr is filled with talented people who can get the job done, and Design Pickle is a more professional service (at a professional price).
After designing and publishing your infographic you can submit it to infographic submission sites to give it some extra power. You should also share it across Tumblr, Reddit, and Pinterest to boost their social reach.
3. Repost Articles on Quora
Ever since Quora was launched in 2010, it has built up a strong and steady reputation and currently sees around 200 million active users each month. If you were to search Google for a question you’d almost always see a Quora search result within the first few results.
Quora offers two ways to repurpose blog content. The first is to create a blog page on Quora and syndicating popular content there. The other is to answer questions related to your content on Quora. The catch is that if you answer questions without doing any research you’ll likely not have any results at all.
4. Convert Posts into Podcasts
Podcasts have become more popular in recent years. If you’ve got a podcast of your own already, then you can just convert a popular post into a podcast episode. If you haven’t started a podcast yet, then it’s time that you jumped on the podcast train. The app Anchor (available on Android, iOS, and desktop web) lets you get set up without any extra equipment.
Anchor allows you to record, host, and distribute podcasts on all major podcasting platforms including Spotify, Google Podcasts, and Apple Podcasts.
After you publish your podcast you can start promoting it to generate more traffic.
5. Create Interactive Content
Having interactive content on your website helps you to stand out against the crowd. According to Business2Community, 88% of marketers say that this interactive content is how they differentiate themselves from the competition.
Thanks to tools like Ion Interactive and Outgrow it’s never been easier to create surveys, quizzes, and other interactive content.
6. Create eBooks Using Popular Posts
Every long-form post could potentially become an ebook that you can then use to entice subscribers into joining your email list. Ebooks make for fantastic lead magnets after all. You could take a single long-form posts and use it to make an eBook, or take several posts on a single topic and connect them together as a guide to that topic.
It’s recommended that you use services such as Beacon to convert blog posts into eBooks. Beacon offers a free plan but you can upgrade to the professional plan ($49/month) to enjoy more benefits and features.
7. Create Presentations from Blog Posts
Another way to get more power from your posts is to turn them into presentations. There are lots of programs that let you do this including Canva, Keynote, Slidebean, and good old fashioned PowerPoint. After you complete your presentation, you can upload it to SlideShare and then embed it into the most relevant posts.
Slideshare has around 80 million active users and it gets a lot of traffic from online searches. That’s why it’s a great place to put presentations. It puts them in a position to get more attention and potentially drive more traffic to your website.
8. Host Webinars
If you have a post that gets a lot of good attention then it’s a sign that you’re giving your target audience something they are interested in. It’s time to consider taking that post and turning it into a webinar on a subject that has generated a lot of organic search traffic for your website.
You could also post a poll on the blog and let your audience choose a topic for you so you can pick something they really want.
Hosting a webinar repurposes content effectively and also helps you to reach out to a wider audience. On top of that, it also builds your email subscriber list. Tools like EasyWebinar make it easy (pardon the pun) to host webinars live or play a pre-created automated webinar.
9. Create an Email Series
You can consider using a series of posts to create an automated series of emails. This gives you the chance to send your best content directly to email subscribers. Choose 10 popular posts and turn them into automated emails that are triggered whenever someone signs up to your email list.
10. Create Micro-Content for Social Media
Long-form blog posts likely have a lot of statistics, facts, and other observations. You can turn that information and distribute it across social media in the form of micro-content to get more attention and build engagement.
Start out by choosing a piece of “pillar content”; a long-form piece of content such as a podcast, video, interview, or vlog. Then turn that long content into several pieces of micro-content such as images, GIFs, quotes, mashups, and blog posts. You can take that content and post it across social media.
Summary
If you need new content for your website, you might not actually need new content at all. There are many ways to repurpose existing content to get more out of it. Try a few different things to see what works well for you and your content.
Share
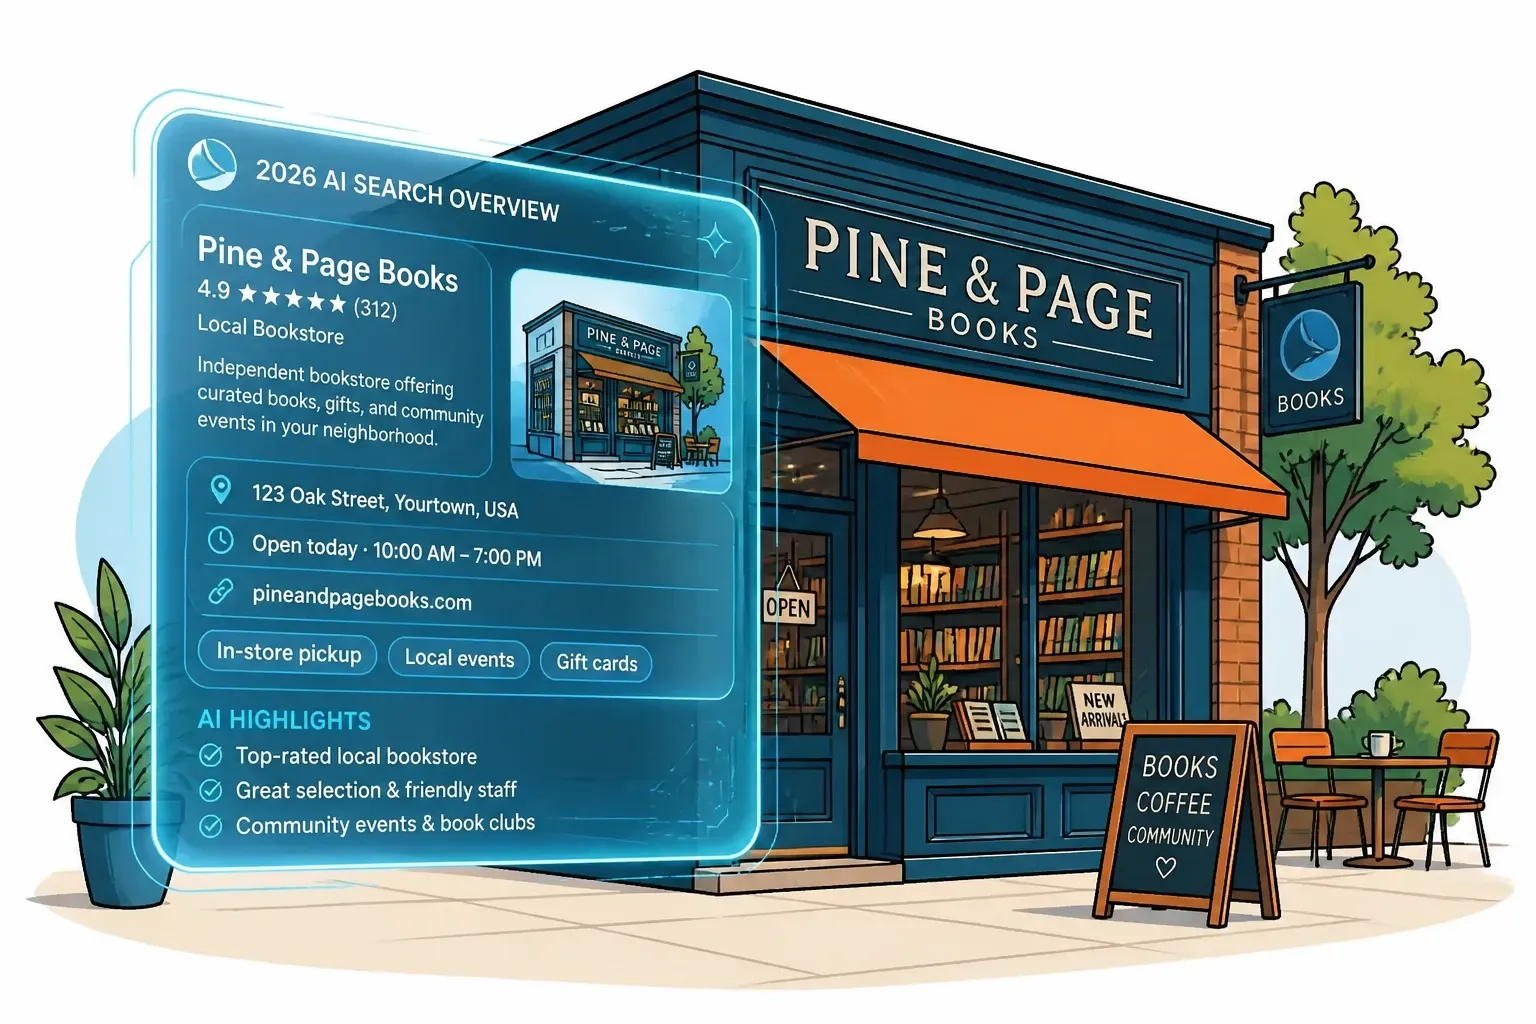
The 10 blue links are gone. In 2026, local SEO means getting cited by AI Overviews. Learn how GEO, Google Business Profile, and E-E-A-T keep your business visible.

Discover proven strategies for real estate agents to optimize their content and websites for AI search platforms like ChatGPT, Claude, and Perplexity. Learn how to dominate AI-powered search results and attract more qualified leads in 2026.
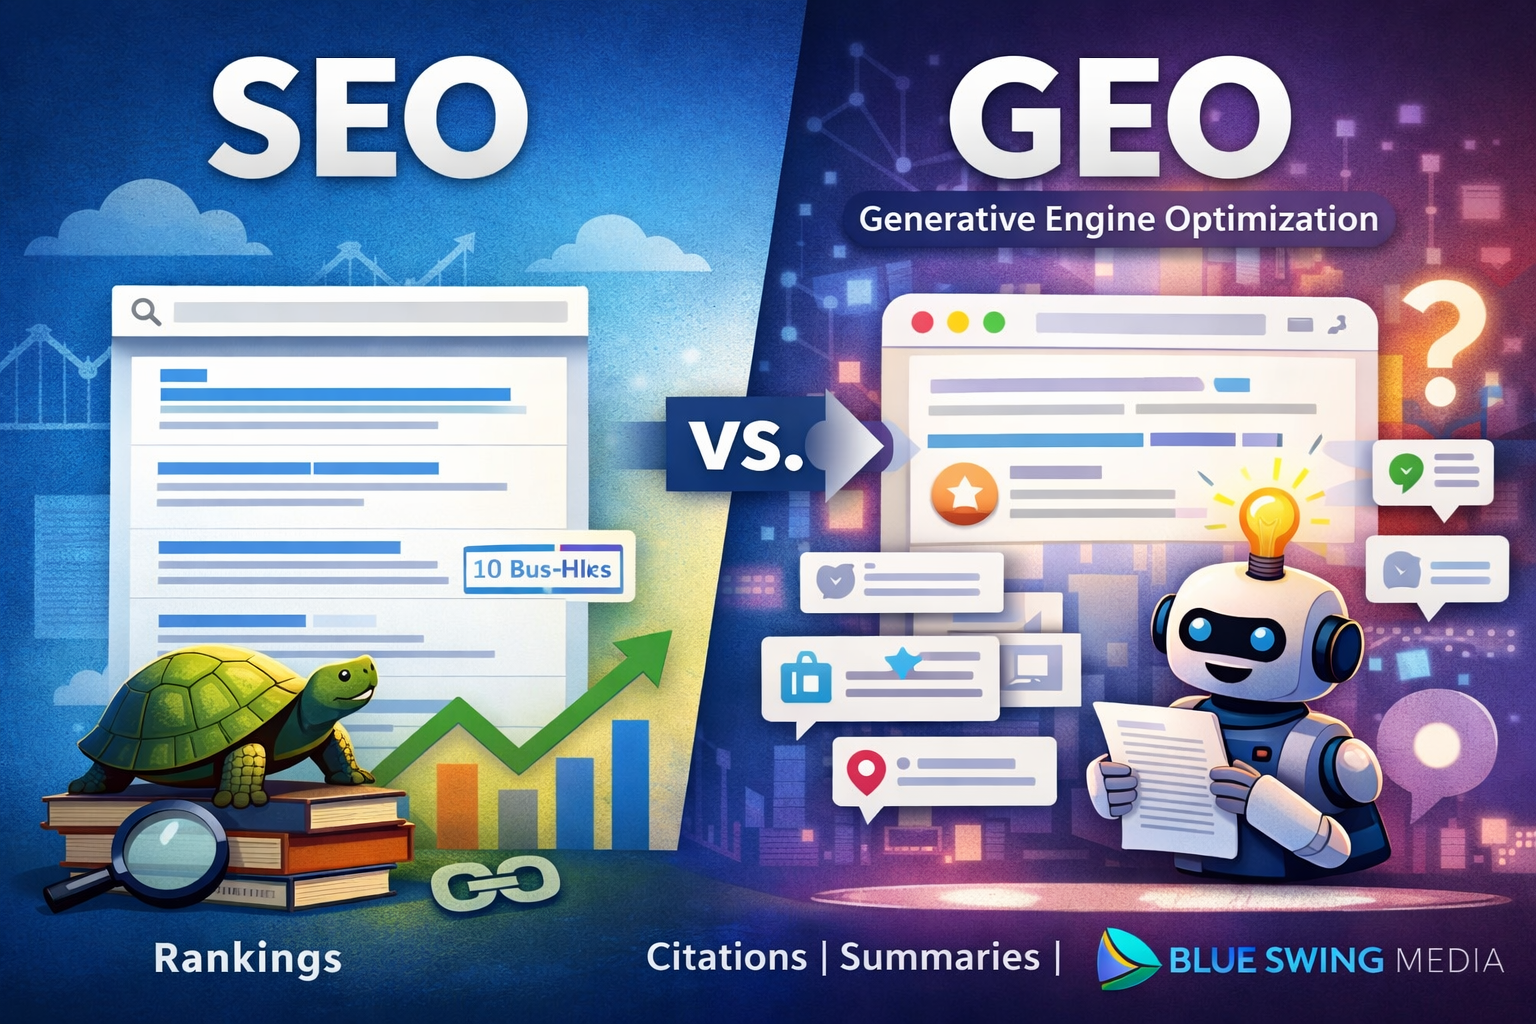
A lot has changed since I published Digital Marketing with Tortoise & Hare in 2017. Back then, the digital marketing conversation was heavily centered on websites, search rankings, social media consistency, and building momentum over time. Those principles still matter, but the landscape has shifted in a big way. Even the way people discover businesses and consume information has changed. My book was published on June 12, 2017, and in many ways, that feels like a different era of digital marketing. One of the newer terms getting a lot of attention right now is GEO , which stands for Generative Engine Optimization . If you’ve been hearing people throw that term around and wondering whether it’s just another buzzword, you’re not alone. But there is something real behind it, and it’s worth understanding. So, What Is GEO? GEO is essentially the practice of optimizing your business, website, and content so that AI-driven search experiences can find, understand, trust, and reference you. Traditional SEO has focused on helping your website rank in search engine results. GEO is more about helping your brand show up in AI-generated answers , summaries, recommendations, and citations. In simple terms: SEO helps you rank. GEO helps you get referenced. That’s a meaningful distinction. Today, people are no longer just typing a keyword into Google and clicking through ten blue links. More and more, they are asking full questions and receiving summarized answers from AI tools. That means your content is not only competing for rankings anymore. It is also competing to become part of the answer itself. Has SEO Been Replaced? No. Let me say that clearly: GEO does not replace SEO. It builds on it. If your website is poorly structured, your content is thin, your service pages are weak, and your business has little authority online, then GEO is not going to magically fix that. The same foundational principles still matter: a technically sound website strong service and location pages clear messaging helpful content consistent brand signals trust and authority In other words, the tortoise still matters. Steady, strategic digital marketing still wins over hype, shortcuts, and shiny-object syndrome. That hasn’t changed. What has changed is that now your content needs to be useful not just for human readers and search crawlers, but also for AI systems trying to summarize the web. Why GEO Matters If AI-powered search experiences continue to grow, businesses that are easiest to understand and trust will have an advantage. That means the question is no longer just: “How do I rank for this keyword?” It’s also: “How do I become the kind of source that AI tools want to cite, summarize, and recommend?” That changes the strategy. Businesses that win in this next phase will likely have content that is: clear direct well-structured specific trustworthy supported by real-world authority The businesses that struggle will often be the ones still publishing vague, bloated, keyword-stuffed content that says a lot without really answering anything.